Why Your E-Invoices Are Failing to Import — and How to Fix It in Minutes!
If you’re importing electronic invoices from suppliers like Mitre 10 and you’re seeing errors along the lines of “product lines cannot be matched”, you’re not alone — and the fix is straightforward.
Here’s what’s happening, and exactly how to resolve it.
What's Causing the Error
Many suppliers include additional charge lines in their e-invoices — things like a Freight Levy or Fuel Levy. When Sympac processes these invoices, it looks for a matching product in your system for every line on the invoice.
If there’s no product in your database that corresponds to that levy, the import fails. The invoice won’t load until every line can be matched.
It’s not a bug. It’s your system doing exactly what it should — protecting you from unmatched charges landing in the wrong place. You just need to give it something to match against.
The Fix: Create a Freight Levy product
NON GL LINK ENABLED SYSTEMS
For NON GL LINK enabled systems:
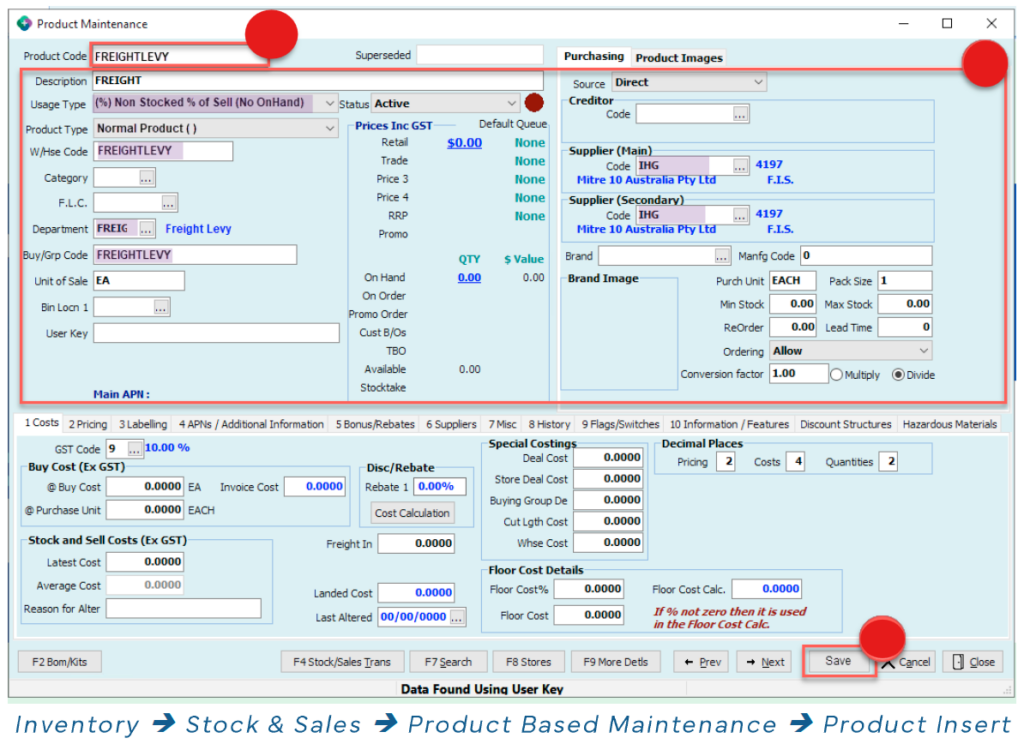
To create a Freight Levy product takes just a few minutes in the Product Maintenance area of Sympac. Follow these steps:
- Open Product Maintenance in Sympac
- Create a new product with these details:
- Product Code: FREIGHTLEVY
- Description: FREIGHTLEVY
- Type: Non-stock (preferred, though stock also works)
- Department: If you are running Sympac General Ledger, this account should be assigned to a department that is linked to an expense account in the General Ledger.
- Set the Manufacturing Code to FREIGHTLEVY. This is the field Sympac uses to match the levy line on the incoming invoice – this must match the details in the einvoice exactly.
- Assign the Supplier Code — for example, Mitre 10. If multiple suppliers include levy lines, you may need a product entry per supplier.
- Add Buying Group / Manufactures code (if applicable). Check with your Sympac support contact if you’re unsure.
- Save the product.
Re-importing the failed invoices
Once the product is set up:
- Go to Electronic Invoices or Goods In Batch.
- Re-import or reprocess the invoices that previously failed.
- The Freight Levy line will now match to the new product, and the invoice should load cleanly.
- Review the invoice and confirm the totals — including the levy amount — are correct before finalising.
How to report the Freight Levy charge to expense GL (Non GL Link)
This is a suggested method for Non GL Link enabled (GL Legacy) systems until the systems are converted into a GL link.
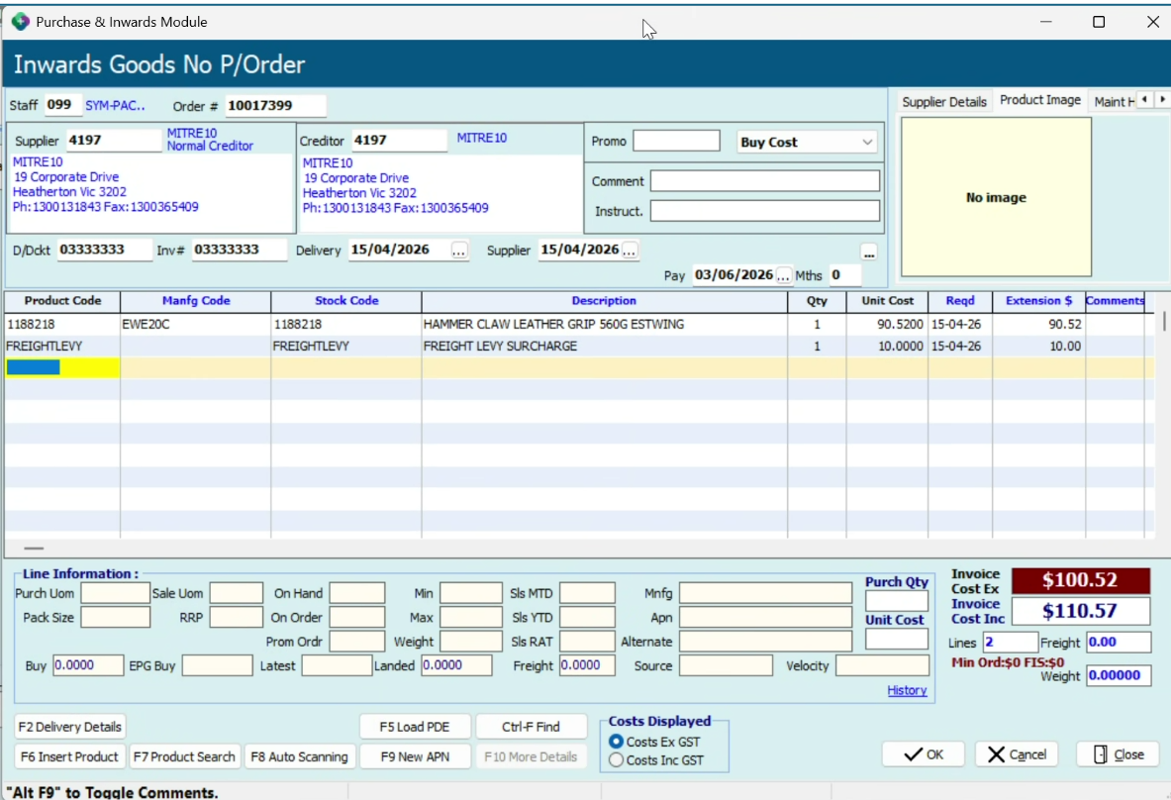
- Setup the product as per the above and record the goods-in as usual.
- The FREIGHT LEVY charge of the product will also post to the store’s STOCK GL account.
- Run a Stock Transactions & Movements report with below parameters.
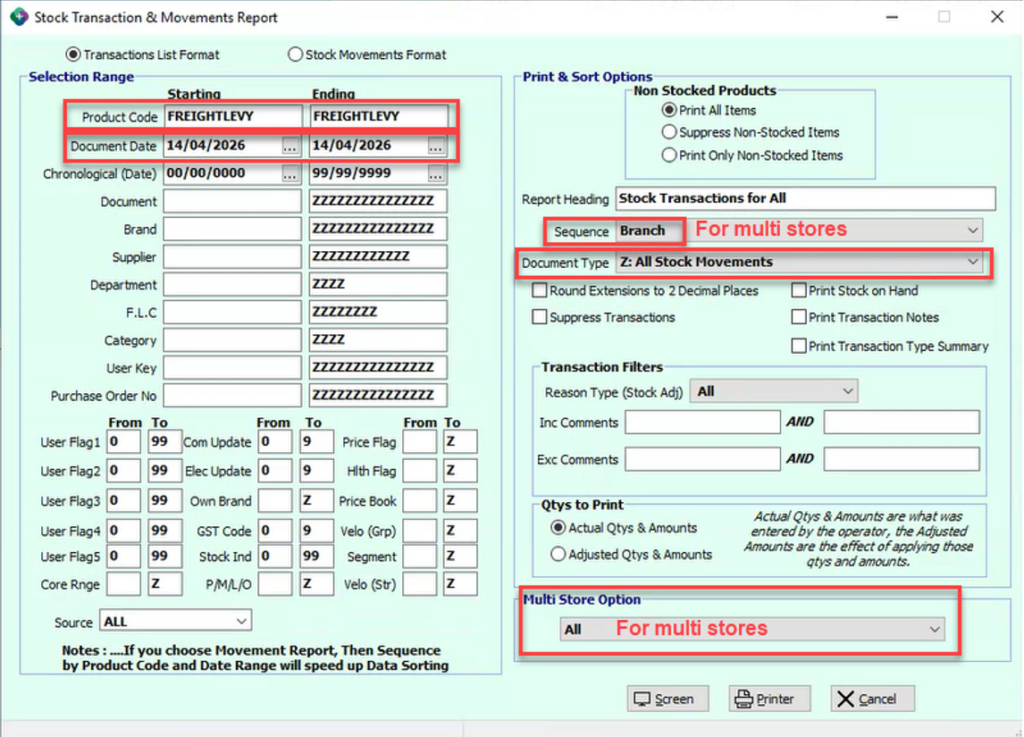
Important Note:
- This report will only provide the values of the FREIGHT LEVY product that was brought in.
- A manual journal will need to be processed to transfer these values from the Stock GL account to the relevant expense account.
GL LINK ENABLED SYSTEMS
For GL LINK enabled systems:
Similar to the above but with one key difference!
In order to receipt in supplier invoices that contain a freight levy, a new FREIGHTLEVY product needs to be setup AND an individual department needs to be setup for this product as well.
Follow these steps:
- Open Product Maintenance in Sympac
- Create a new product with these details:
- Product Code: FREIGHTLEVY
- Description: FREIGHTLEVY SURCHARGE
- Type: Non-stock (preferred, though stock also works)
- Set the Manufacturing Code to FREIGHTLEVY. This is the field Sympac uses to match the levy line on the incoming invoice – this must match the details in the einvoice exactly.
- Assign the Supplier Code — for example, Mitre 10. If multiple suppliers include levy lines, you may need a product entry per supplier.
- Add Buying Group / Manufactures code (if applicable). Check with your Sympac support contact if you’re unsure.
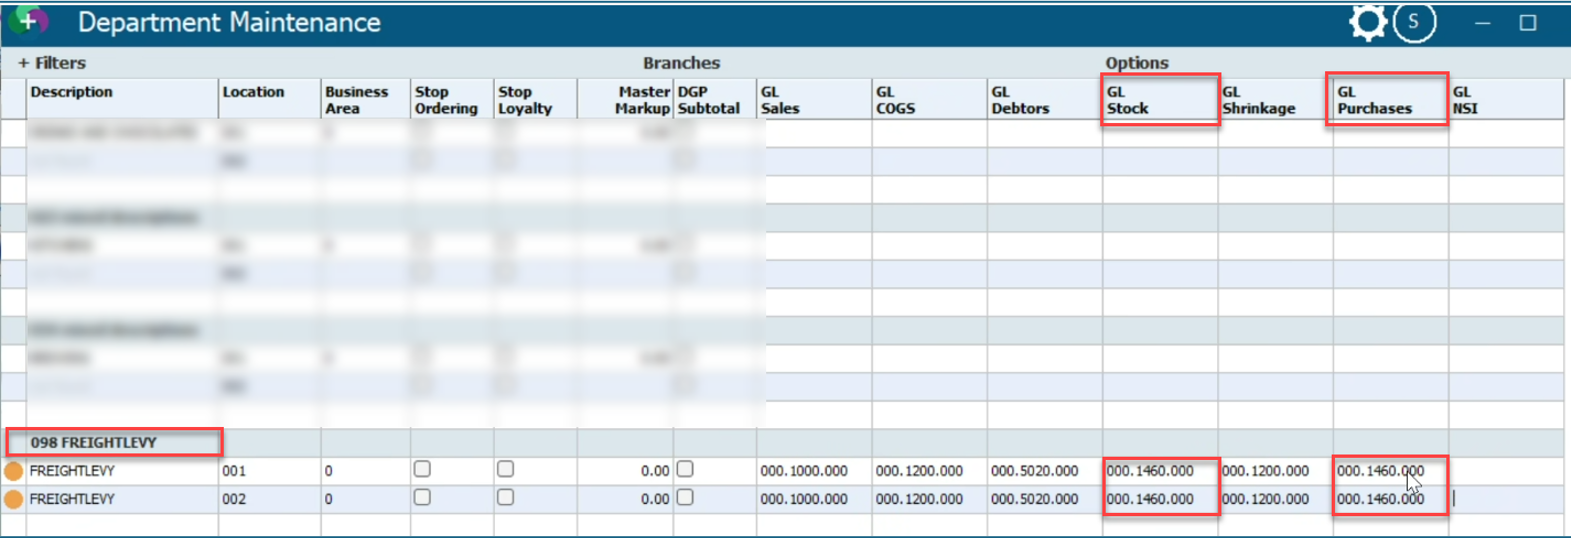
- GL LINK ENABLED systems must have a department set uip for the product.
- In the screenshot example below the cost of the FREIGHT LEVY product will be posted to 000.1460.000 FREIGHT account.
- In department maintenance, create a new department and add this GL account code to the ‘GL Stock’ and ‘GL Purchases’ columns (as shown in the screenshots examples below)
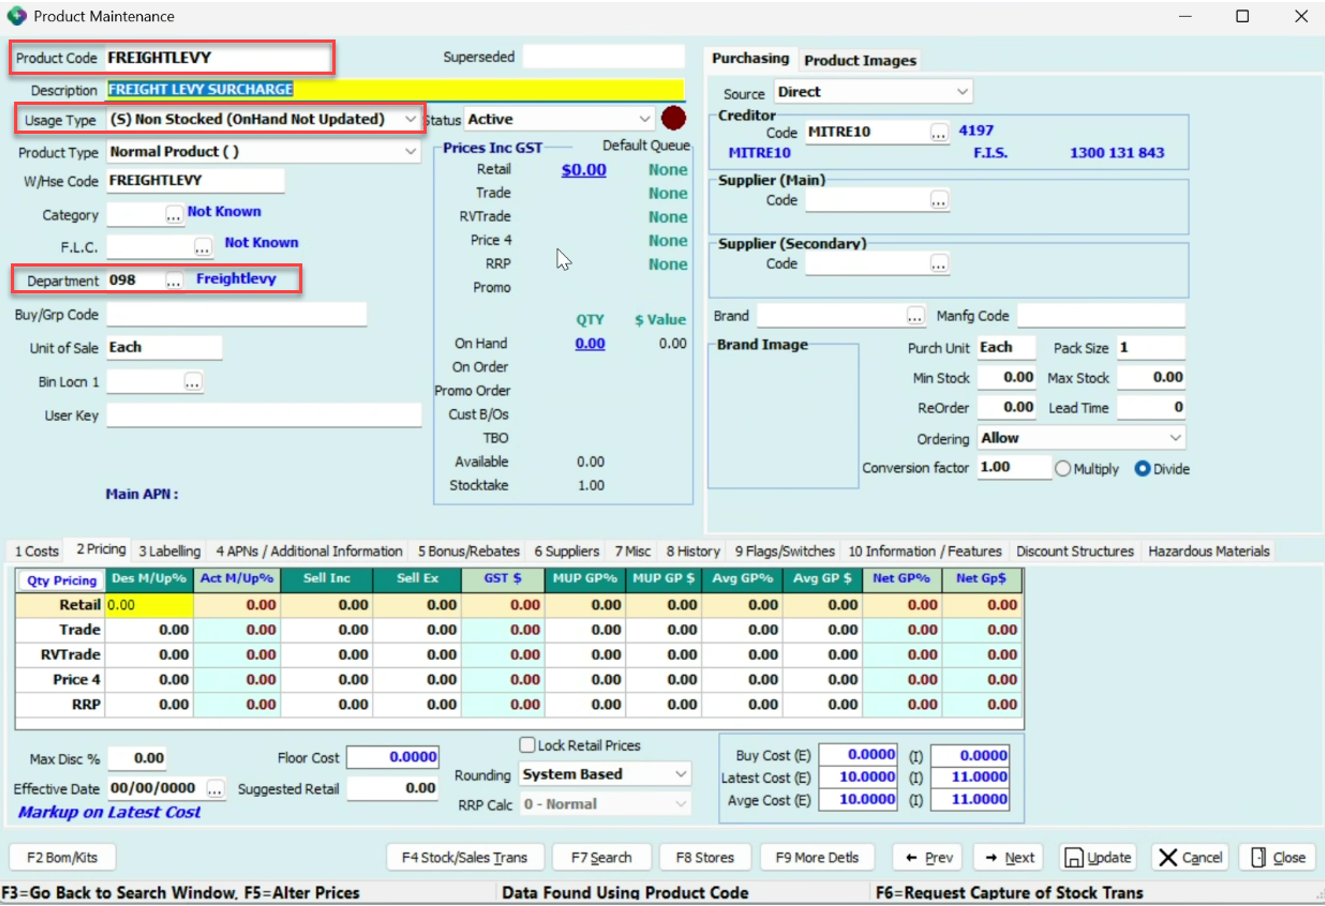
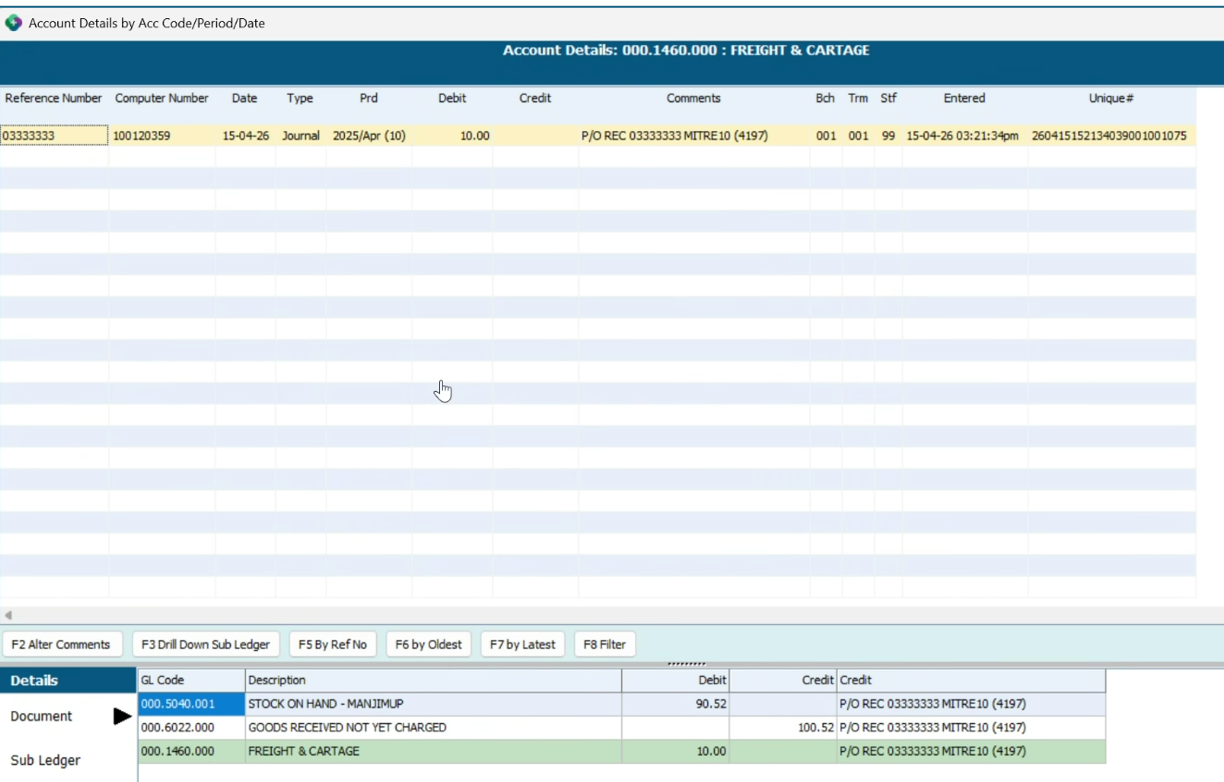
Once you have reimported the invoices (and ongoing) when the goods-in is completed, the value of the FREIGHT LEVY product will go into the GL account that we specified above in Step 6. (i.e. posted to 000.1460.000 Freight Account).
Re-importing the failed invoices
Once the product is set up:
- Go to Electronic Invoices or Goods In Batch.
- Re-import or reprocess the invoices that previously failed.
- The Freight Levy line will now match to the new product, and the invoice should load cleanly.
- Review the invoice and confirm the totals — including the levy amount — are correct before finalising.
- Remember that for GL Link enabled systems once you have reimported the invoices (and then ongoing) when the goods-in is completed, the value of the FREIGHT LEVY product will go into the GL account that we specified above in Step 6. (i.e. posted to 000.1460.000 Freight Account).
Need a hand? We’re here to help!
If you need any assistance or have any questions please call the Sympac Help Desk on (03) 5649 6200 and we will walk you through it! Our team are available from 7am to 8pm EST to assist you.
Related Posts
Manage fuel & freight costs with Sympac!
Accurate freight cost recovery and landed cost management are essential to protect margins and ensure business profitability.